This fall I moved across the country. This meant I left my roommate's hand-built coffee table behind and needed my own. I figured as an engineer I should be able to build a table. I thought it would take 1 or 2 weeks. I followed the tried-and-true path of every failed aerospace start-up by spending too much time designing (entire Saturday) and then spending a boat load of money on tools without any actual hardware to show for it. This did result in a hand-drawn engineering drawing (Fig. 1) and a basic set of woodworking tools that should last me 20+ years. By weekend 3 I finally started cutting wood. Or at least trying to cut wood. I cut my first 2x4 in my apartment building and realized that was insane. The next day I took my second attempt in a friend's backyard but couldn't get a straight cut by free handing the circular saw. When describing my problems, a coworker suggested I use a speed square as a guide for the circular saw. This worked like a charm. With the speed square, a couple clamps, and circular saw I could cut anything. I used a Kreg jig to fasten the pieces for my frame (sorry woodworking community, no time for joinery). I held the wood pieces together by hand when screwing them together. Although I matched wood pieces together by seeing which created the best 90° angles off each other, I feared the table would wobble or would crack from being "forced together" when I attached the final pieces. To my pleasant surprise, when I completed screwing the frame together and placed the table on its legs, it stood wobble-free. I was thrilled. This was the moment where I felt like I can make anything. I started with no knowledge and couldn't make an accurate cut to save my life. And now I had successfully turned a pile of wood into a flat, sturdy table frame (Fig. 2).
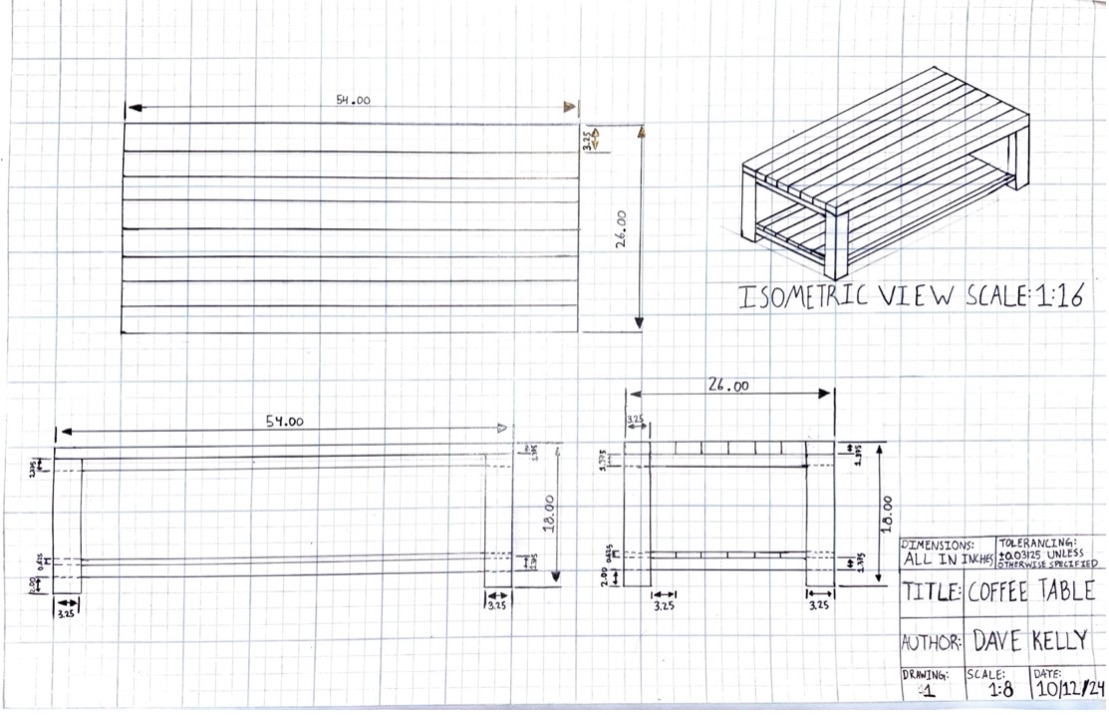
Figure 1

Figure 2
After the frame was complete, I went to make the tabletop. I ended up using three 2x10's instead of eight 2x4's as shown in my original engineering drawing. I realized that without a planar to run the planks through, it would be pretty hard to make the eight planks into a flat tabletop. Eight 2x4's would also give more of a picnic table appearance rather than coffee table. I cut the 2x10's individually before glueing them together. A smoother edge could've been achieved by cutting the edges of the tabletop after glueing, but the small differences in plank length are pretty unnoticeable. I made sure to alternate the grains to counteract the cupping tendencies of the wood as time went on. I used wood glue between the planks and clamped them together width wise. I also clamped four spare 2x4s on the top and bottom of the table on each length side to keep the tabletop flat as seen in the photo below (Fig. 3).
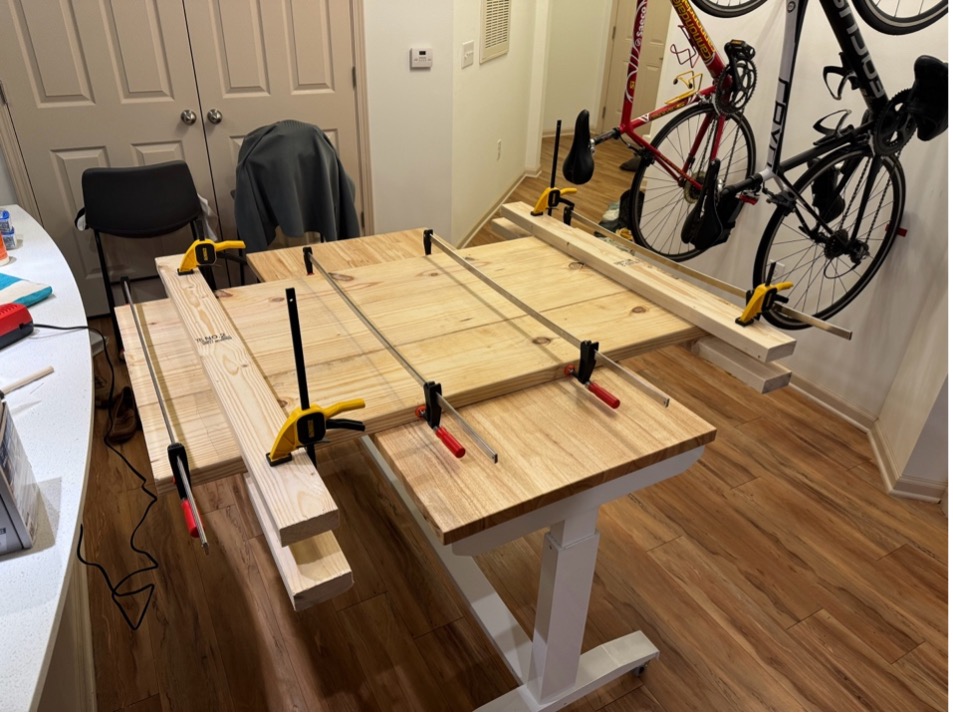
Figure 3
Attaching the tabletop to the frame was where I made the largest mistake in the manufacturing of the table. I flipped the tabletop upside down on my floor and sat the frame (also upside down) on top of it. I screwed the frame into the tabletop, assuming the weight of the frame would keep the tabletop and frame surfaces flush. Upon flipping the table back over, I realized there was a gap between the tabletop and frame as large as 1/2" in some places. It wasn't the end of the world, but it's noticeable.
I pushed forward with sanding, staining, and painting the next day. Why would I use both stain and paint you may ask? Well, it turns out that the "green" wood at Home Depot is not just from a gross tree. It is pressure treated wood for outdoor use (meaning it is more expensive & worse for my use case!) I decided to turn this bug into a feature and paint the wood with latex paint. This would prevent a mismatched color of the stained wood & hopefully "seal-in" some of the chemicals of the pressure-treated wood. The online community was mixed about using pressure-treated wood inside, but I figured because it was on the lower part of the table & painted it would be alright. The contrasting grey planks ended up being one of my favorite aspects of the table. Staining the rest of the table worked wonderfully. The stain elevated the project from a piece that looked like the result of a boy scout earning his first woodworking merit badge into a piece of furniture that belonged in a living room. Before and after photos below (Fig. 4 & Fig. 5).

Figure 4
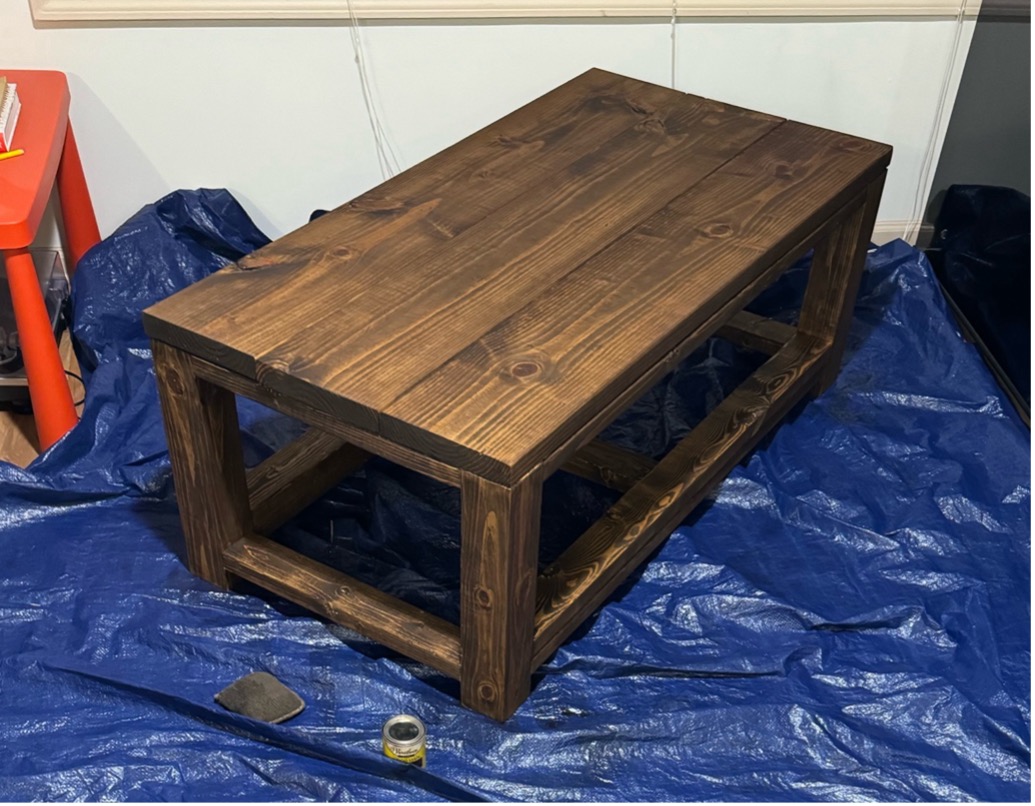
Figure 5
The final step was to coat the whole thing in polyurethane. I initially applied two coats, which left some areas still feeling a little rough. I ended up adding two more layers to the tabletop, really dousing it on. That ended up working and giving me a nice smooth top.
The staining and polyurethane revealed some swirl marks my random orbital sander had left when I sanded down the table. After a little bit of research, it looks like the swirls were probably left by me applying too much pressure to the sander and not going to a higher grit (I stopped at 220 - probably could've gone to 320). The table was also far too heavy. Looking back, at a minimum I should've made the bottom shelf flush with the frame instead of stacking 4 additional planks of wood on top of the bottom part of the frame (the 2 grey planks and 2 2x4's along the bottom outer length of the table). I also could've use 1" planks for the tabletop. All that said, I do like the sturdy look of the table.
Overall, I'm stoked with the end product as my first woodworking piece and first major engineering project. I give the table a pretty proud 5/10.
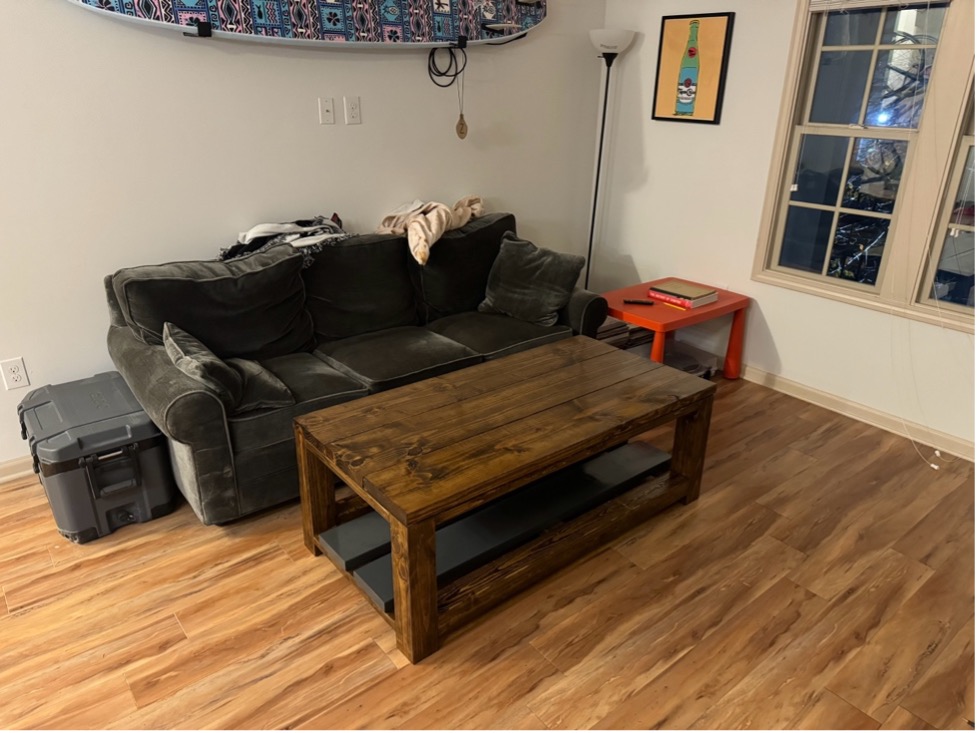
Figure 6: Table (December 2024)
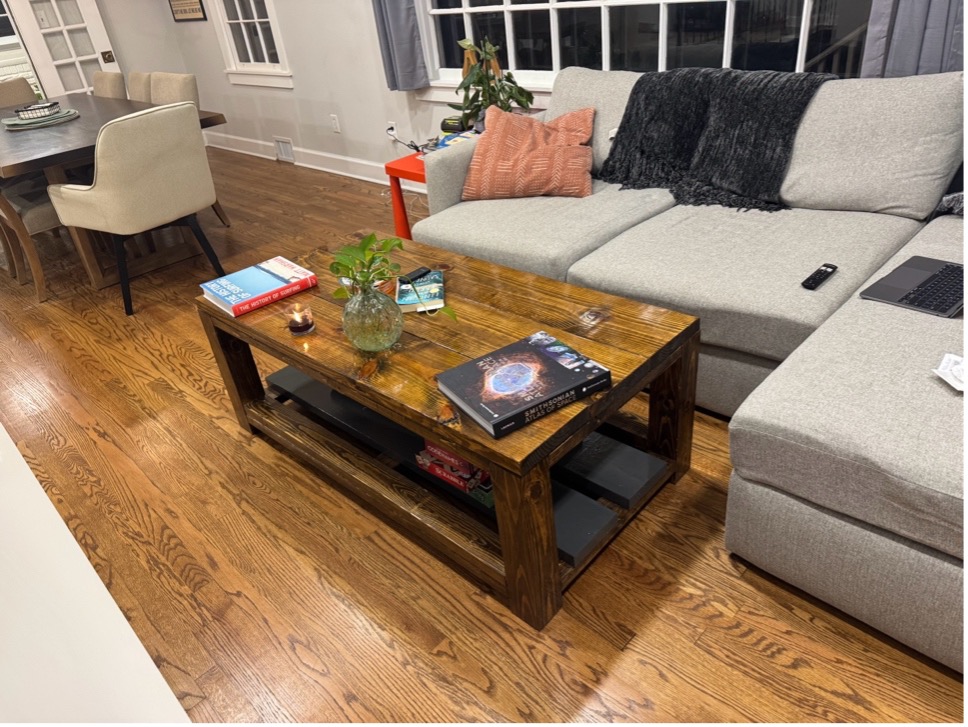
Figure 7: Table still going strong! (October 2025)
Start date: 10/12
Finish date: 11/26
10/12 (Saturday): Bought all drawing materials. Completed drawing. Learned about engineering drawings. Not that hard to do a 3D isometric view. Also learned coffee tables should be 2/3 of sofa length.
10/19 (Saturday): Spent a shit ton of money on tools
10/20 (Sunday): Tried using the circular saw in my apartment and felt like an absolute psycho
10/26 (Saturday): Started cutting at a friend's house. Could not get a straight cut by hand with a circular saw. Tried improvising a guide by clamping a 2x4 plank to the plank that was being cut. Still did not cut straight.
10/28 (Monday): I am introduced to the concept of a speed square. I don't know this yet, but this will change my life.
11/5 (Tuesday): Start cutting with speed square. Am able to get awesome cuts. Figured out the speed square + my circular saw shoe was 1.5", so with that measurement I could very quickly measure, line up, and make accurate cuts. I could hit sub 1/32nd of an inch if I really focused on lining it up. On 4x4s, I tried cutting the top and bottom and lining them up visually, which didn't work. Then I tried cutting the top, rotating it to one side and using the cut as a guide to align the speed square. Then cutting, then rotating one more side with the same method to complete the cut. Then use pocket hole jig (super easy, no complications here) to make my 1st frame. So much done in this day. Feel like I can literally build anything.
11/10 (Sunday): Made a bunch of cuts and completed the table frame. I was assembling the frame on its side and holding the parts together by hand, so I was shocked when I placed the frame flat on the ground and there was no wobble. That was unreal. Really felt like I was cooking with fire at that point.
11/14 (Thursday): Made final cuts (at least I thought so) and brought everything from my friend's house back to my apartment. They were cuts for the tabletop and the lower planks.
11/21 (Thursday): Joined the tabletop. Flipped the grain of the middle plank so they wouldn't all warp in the same direction. Used some clamped long 2x4s to ensure flatness of the top.
11/23 (Saturday): Made real final cuts (sorry neighbors!) for a support beam on the top of the table and bottom. Attached the tabletop to the frame by placing the tabletop upside down on the floor, placing the frame in the proper place, and using 2" wood screws through the frame into the tabletop. This was a big mistake of a method. As I screwed in the frame, gravity wasn't enough to keep the frame flush with the tabletop, and a couple 1/2" gaps formed between the tabletop and frame in certain places. Not the end of the world but probably the biggest flaw in the piece. I should've done this on my working table with the ends hanging off the side so I could clamp all of the pieces together. Alternatively, I was told by a coworker that I should've drilled a hole a little wider than the screw into the 1st surface the screw would penetrate, so that the thread was only locking with the second surface. The screw head would keep the 1st surface piece attached. IDK if this is necessary.
11/24 (Sunday): Sand & stain! I used Varathane Classic Provincial wood stain and it worked well. Painted the pressure treated planks grey. Tack cloth before stain after sanding to get all the residue off.
11/25 (Monday): Attached the grey planks to the bottom of the frame (using clamps this time! Better results). Then polyurethane, polyurethane, polyurethane, polyurethane. In the end I did a meh job of applying the polyurethane. Not the smoothest finish. But at this point I just needed a surface to eat on and kick my legs up on.
11/26 (Tuesday): Cleaned up and set the table up in my living room!
Note: I put this together almost a year after I built the table with some receipts I had saved. This is not a comprehensive accounting but is probably useful for reference of some specific tools used and their cost.
| Item | Quantity | Cost |
|---|---|---|
| 2"x8"x8' wood | 2 | $21 |
| 2"x4"x92" wood | 1 | $16 |
| 4"x4"x10' wood | 1 | $16 |
| Wood glue | 1 bottle | $8 |
| Drywall screws | 1 lb | $7 |
| Polyurethane | 1 can | $16 |
| Stain oil | 1 can | $10 |
| Total | $100 |
| Tool | Quantity | Cost (total) | Estimated life % used for this project | "Amortized Cost" |
|---|---|---|---|---|
| Makita Circular Saw | 1 | $149 | 5% | $7 |
| Husky Adjustable Height Working Table | 1 | $304 | 1% | $3 |
| Milwaukee Battery & Charger | 1 | $99 | 1% | $1 |
| Kreg Pocket Hole Jig | 1 | $100 | 25% | $25 |
| Random Orbital Sander | 1 | $84 | 20% | $17 |
| 36" Metal Clamps | 4 | $100 | 10% | $10 |
| Milwaukee Shop Vac | 1 | $35 | 5% | $2 |
| Plastic Dewalt Clamps | 6 | $35 | 10% | $4 |
| 5" Circular sandpaper - 220 grit | 50 | $20 | 5% | $1 |
| 5" Circular sandpaper - 150 grit | 15 | $10 | 5% | $1 |
| 5" Circular sandpaper - 60 grit | 15 | $10 | 5% | $1 |
| KN95 Mask | 1 | $6 | 25% | $2 |
| Hearing Protection Earmuffs | 1 | $22 | 20% | $4 |
| Paint Brush | 1 | $3 | 100% | $3 |
| C Clamp | 2 | $22 | 10% | $2 |
| Circular Saw Blade | 1 | $15 | 25% | $4 |
| Foam Brush | 2 | $2 | 100% | $2 |
| Zinc Screws | 50 | $10 | 10% | $1 |
| Tack Cloths | 3 | $4 | 100% | $4 |
| Staining Pads | 4 | $8 | 100% | $8 |
| Hand Plane (did not use) | 1 | $50 | 50% | $25 |
| Total | $125 |
PS: I bought a few things from hobby lobby but apparently, they only label their items on your receipt as "arts" or "crafts," so I have no idea what they were.